Professions and in-game money (cont.)
Now, let's get back to Profession Trainer Lien Farner.
Starting Profession Trainer NPCs like Lien are unique in that they can teach
you more than one Profession Skill; most Profession Trainers that you'll find
elsewhere specialize in only one Profession. The limitation with starting
Profession Trainers like Lien is that they can only teach you the Apprentice
level of a Skill, and they can't teach you any new recipes/schematics/blueprints/etc
for Crafting Skills as you improve them.
When you speak to Lien Farner, you'll see a line in his dialogue box that says "Tell me about gathering professions;" click on it. In the next dialogue box, click on the line "Tell me about Skinning," and then "Train me in Skinning." You will see this window:
When you speak to Lien Farner, you'll see a line in his dialogue box that says "Tell me about gathering professions;" click on it. In the next dialogue box, click on the line "Tell me about Skinning," and then "Train me in Skinning." You will see this window:
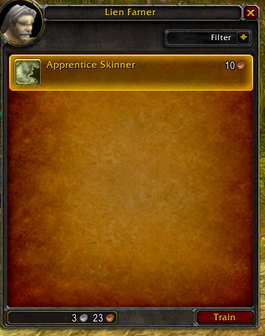
Click "Train," and then "Accept" to
confirm Skinning as your first Gathering Skill choice. Close the Skill training
window, and speak to Lien again for your next Gathering Skill. Herbalism would
be a good choice for a second Gathering Skill, but for right now, we'll go with
Mining. Click on "Tell me about Mining," then "Train me in
Mining," and then "Train" and "Accept." You have now
taken Mining as your second Gathering Skill. Once you do, make sure to click
the magnifying glass icon next to your Minimap, and then check the box for
"Find Minerals." This will cause indicators for ore nodes to show up
on your Minimap.
Before you get started with Mining & Skinning, you should talk to Tharynn Bouden, the Trade Supplies vendor standing next to Lien. Tharynn can sell you a Skinning Knife & Mining Pick to use, and while you don't actually need them for Mining & Skinning, they're good to keep in your inventory anyway since they each provide a 10-point bonus to their respective gathering skills.
Now, where do you find things to skin and mine? Well, Skinning is easy enough: most animals you kill can be skinned, and you can find some Stonetusk Boars just to the southeast of Lien and Tharynn which will serve as an excellent example.
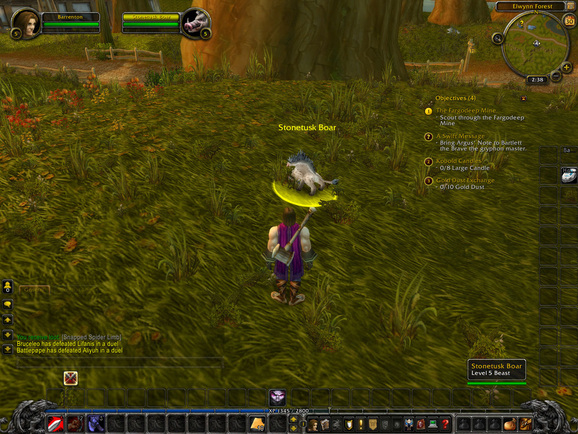
Find a Stonetusk Boar, kill it, and loot its corpse. Now,
hold your mouse cursor over the corpse. See how it turns into a symbol that
looks like a curled-up piece of leather? This signifies that a corpse can be
skinned. You'll also notice the word "Skinnable" in orange text in
the tooltip window that appears when you point at the corpse.
The color of that text on the tooltip of any gatherable material signifies whether you will increase your Skill by gathering it, and whether you will get good amounts of the material you're trying to gather (as opposed to tiny fragments or worthless junk). The tooltip color indicators are:
Right-click on the boar's corpse to begin skinning it (this will take a few seconds). Your Skinning will increase to 2, and you will likely loot a piece of Ruined Leather Scraps, which is all you will likely get at this low Skill level. Ruined Leather Scraps won't earn you as much money as pieces of Light Leather, Medium Leather, and Heavy Leather will, but you might still want to hang onto them, since you can combine three of them at a time to get one piece of Light Leather.
Now, let's look for some ore to try your Mining Skill on. Generally, it's a good idea to look for ore nodes along hillsides or (obviously enough) inside mines. To start out, you'll need to click the magnifying glass on the edge of your Minimap, and then check the box labeled "Find Minerals," so that ore node indicators will show up on your Minimap. These indicators appear as little yellow dots; hold your mouse cursor over them to see a tooltip saying what kind of ore it is. Once you spot an ore node on the Minimap, walk over to it and face it (be careful to keep an eye out for hostile animals and/or monsters).
The color of that text on the tooltip of any gatherable material signifies whether you will increase your Skill by gathering it, and whether you will get good amounts of the material you're trying to gather (as opposed to tiny fragments or worthless junk). The tooltip color indicators are:
- Red--Can not be harvested, because you lack the appropriate Skill
- Orange--Will definitely increase your Skill
- Yellow--Will most likely increase your Skill
- Green--May or may not increase your Skill
- Gray--Will not increase your Skill
Right-click on the boar's corpse to begin skinning it (this will take a few seconds). Your Skinning will increase to 2, and you will likely loot a piece of Ruined Leather Scraps, which is all you will likely get at this low Skill level. Ruined Leather Scraps won't earn you as much money as pieces of Light Leather, Medium Leather, and Heavy Leather will, but you might still want to hang onto them, since you can combine three of them at a time to get one piece of Light Leather.
Now, let's look for some ore to try your Mining Skill on. Generally, it's a good idea to look for ore nodes along hillsides or (obviously enough) inside mines. To start out, you'll need to click the magnifying glass on the edge of your Minimap, and then check the box labeled "Find Minerals," so that ore node indicators will show up on your Minimap. These indicators appear as little yellow dots; hold your mouse cursor over them to see a tooltip saying what kind of ore it is. Once you spot an ore node on the Minimap, walk over to it and face it (be careful to keep an eye out for hostile animals and/or monsters).
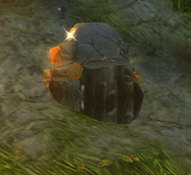
To mine an ore node, simply hold your mouse cursor over it
(the cursor will turn into a pickaxe symbol), and right-click. Mining the node
will take a few seconds, just as it did with skinning an animal. Your Mining skill
will increase to 2, and you will receive several pieces of Copper Ore in your
inventory. As you increase your Mining skill, be on the lookout for new types
of ore nodes to mine (Tin, Iron, Mithril, etc).
As you increase any Profession Skill, you'll need to remember to visit a Profession Trainer NPC periodically to learn the next level of the Skill, so you can keep increasing it. Press the "K" Key on the keyboard to bring up your Professions window.
As you increase any Profession Skill, you'll need to remember to visit a Profession Trainer NPC periodically to learn the next level of the Skill, so you can keep increasing it. Press the "K" Key on the keyboard to bring up your Professions window.
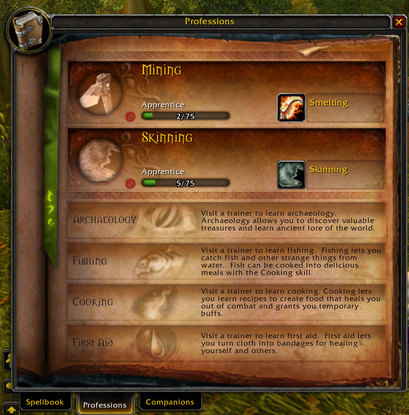
Here you can see the progress you're making with your
Profession Skills, so you know when it's time to visit a Profession Trainer.
You could wait until a Skill's progress bar is full, but you can actually visit
a Trainer for the next level of a Skill before that. For example, you could
visit Skinning and Mining Trainers once those Skills are at 50 to learn the
Journeyman level of each Skill. Higher levels of Skills (beyond Journeyman)
also require a minimum Experience Level for your Character before you can learn
them.
Your Professions window also features icons for Profession Skills that can be placed in Action Bar slots for easy access. You don't need to do that with Skinning, but it would be a good idea to drag the Smelting icon for your Mining skill to an Action Bar slot. Note that you have to be standing near a Forge (found near Blacksmithing Trainers and Vendors) in order to Smelt ore.
Now that you've got a basic grasp on Profession Skills (you can learn the Secondary Profession Skills another time), let's get back to completing Quests! Start by heading south to Fargodeep Mine, where you can complete the Quests you got from Marshal Dughan, William Pestle, and Remy "Two Times" (check your World Map if you need help finding your way to the mine). For now, don't worry about the quest "A Swift Message," which you got from Smith Argus--you'll do that one later. As you travel to Fargodeep Mine, you should take this opportunity to get in the habit of killing & skinning boars & any other animal you can skin, as well as mining any ore nodes you find.
Be careful on the way there, because some of the hostile animals, bandits, and Kobolds (a small, rat-like Humanoid race) in the area may be too high-level for you to fight effectively (the Level number in their Character Portraits will be orange or red if that's the case).
Note: If you ever encounter an enemy with a skull in place of a Level number in its Character Portrait, stay away from it! You can not, under any circumstance, fight such an enemy alone!
This website is not affiliated with Blizzard Entertainment, Inc.
World of Warcraft, The Burning Crusade, Wrath of the Lich King, Cataclysm, Mists of Pandaria, Warlords of Draenor, and Legion are registered trademarks of Blizzard Entertainment, Inc.
World of Warcraft, its associated expansions, all content described by this guide, and all images contained in this guide are the sole intellectual property of Blizzard Entertainment, Inc. No copyright or trademark infringement is intended.
Any questions, comments, or concerns about this guide? E-mail: [email protected]
